Friday, October 28, 2016

Red, white...bobbles


The multi-month Pin Challenge is finally complete! This was work in the end with 2 strands of size 10 crochet thread. I began with a ball of bamboo thread that I had laying around. Then I switched to mixing a strand of metallic thread to give it a bit of sparkle. That quickly lost it's appeal because it was such a hassle trying to keep the threads from tangling with one another. The effect was very pretty, I simply didn't have the patience to keep all those threads together. So I began again, with 2 strands of thread.
After completing the base and side panels, I went to work on the bobble panel of the purse. After one was done, I saw my tension needed to be reworked, so I unraveled it and began again.
 
The smaller ball is some of the thread from the larger ball rewound onto it to make it easier to manage the threads. I joined the sides together because I kept misplacing them and didn't want to have to redo those as well.
This is one completed bobble panel! I was so happy when it was done. 


My sewing skills are almost non-existent so I did my best to join them without being too rough. I have to say, as I was joining the second bobble panel, I got nervous. The opening left was not very much and I was afraid of how tight the top would end up.

It seems to hold quite a bit for being small. Now the instructions say to reinforce it with some crafting foam or something similar. I didn't do it at this stage because the bag has gotten a bit dingy with all the handling. I also had to try and find the finding to attach the handles to the purse. I actually didn't want to spend anymore on this purse, so I looked through my stash until I found some mini buckles that are for para-cord bracelet making. There were 6 in the pack, so I was thinking of doing a longer handles for when I wanted to use it as a backpack or crossover purse. This is where the buckles made it adaptable. I did buy the zipper in black to match the buckles and try to bring in the colors together.


This little purse holds quite a bit of stuff and is just the right size for me. The edges there a bit pronounced, and I thought of undoing that and restitching it. Then, my youngest said the words I dread..."Mom, is that for me?" It took me 2 balls of size 10 thread crochet thread and almost 6 months of work to get it done. Making another one with my hands muscle memory still fresh shouldn't be too hard right?

Saturday, August 27, 2016

August...thirsty

June and July's challenge are still WIPs. Since they both use the same skill set I'll post them together on a later post. This month's challenge was actually suggested by my sister-in-law. She found this cute Pokémon Bulbasaur planter on Pintrest. Then after going to YouTube for further reference, a self watering one was discovered! The original planter was made with a 3D machine, this version is an adaptation. It was made with clay and painted afterwards and made self-watering.


With a bulk box of white Sculpty clay we began molding it. This process actually took an hour to complete. I was too focused on doing that, that I neglected to take pictures. As the main planter was baking, we made the small bowl that would hold water for the plant. After baking and painting we sealed it with a few coats of waterproof varnish. I have to admit, we began to lose some patience after painting the main planter. A piece of sponge acquired at the dollar store was cut out for the tongue. We inserted a Succulent and Poof! He's done!


Looking at my version I noticed, too late, that my Bulbasaur looked a bit cross eyed. That's okay though, I'll just say he's really focused on his aim! This was such a cute a fun project that I may make a couple more using other round-ish Pokémon, like Oddish , for example.

Saturday, April 30, 2016

April's Challenge: Conclusion

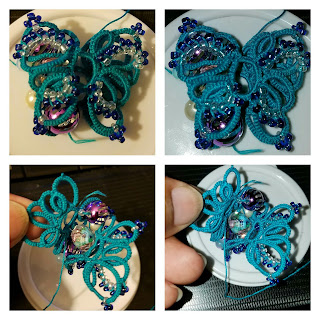
I set aside the blue one and began again in Lizabeth Charcoal. The reason for this is the beads. They was too much discrepancy between the sizes that it was awkward to work.  
Even though the thread size is the same, I had better results when I got beads closer in size. Another obvious mistake is the loading of the seed beads. I still like how it turned out. Once again I began with tatting the non-beaded butterfly then the beaded one. This time around, I didn't have any thread waste.
 The antenna was made with 32 Gauge silver wire.

 The most frustrating thing was the actual "weaving" of the extra beads. I broke at least 4 needles. Today while purchasing new beads to finish this, I came across these needles in the beading section of Joann's Fabrics and Crafts store. They are large eye beading needles. They are not cheap, luckily, I had a 60% coupon that took the sting out of buying them. I don't bead, so in all honesty, I can't say if they're expensive or not but $7 for two needles is expensive to me. These wonderful needles held up to the stress of running the thread several times through the beads, with the help of some pliers.
I highly recommend watching the videos while making this for the first time. Without it for reference I would have sewn in the beads completely wrong. I will have to make this at least once more. I had it in mind to gift this. However, the first finished one I'm keeping for myself.  This is a beautiful pattern and I wished she also gave instructions on how to make the matching band to turn it into a ring. I'm going to have to visit her patterns for sale and add to my pattern collection.

Wednesday, April 20, 2016

April's update

Progress has been made. It took a surprising amount of thought and wasted thread to figure out the order of threading those beads. In the end I loaded them from the left upper corner of the pattern to the right. I started with the single one on the core thread then the blue. Then the white group then blue group for each wing. I only used one shuttle and left about 2 inches before starting that self closing mock ring which lies in the center. This way I kept it continuous so no extra hiding and balancing the knots out.

I did have to go back and use the videos for reference a lot. After the second mistaken bead load, I grew frustrated and did the bead-less version just to make sure I made the wings correct. Even that gave me issues at first. The graph of the pattern was playing tricks with my mind. It was the video to the rescue again. I realized when I saw the bead-less version that after the smaller 10 Ds ring, the next two rings are tatted prior to the next six chaining section. After that the Ring is thrown, which is the fourth ring on the right side then the next two rings are made before doing the next chaining section on the mock ring. The left side is the same.

When I reached the last large ring with the 4 beads in it and after making it , I threaded the core thread through the loop at the beginning of the mock ring and closed it. Then I hid that thread in the final 10Ds ring. Now I ran that thread tail through the beginning 3 Ds at the beginning of the mock ring.
This is the butterfly almost finished. The sewing in beads are giving me quite a headache. It's probably because I didn't have the correct size of beads and I'm just working with what I had on hand. I really don't like beading. This is where I wished YouTube translator actually worked better. Watching the third and fourth part of the video tutorial, made it abundantly clear that the voice over instructions held crucial information on the proper attachment of these beads. It didn't help that the camera went out of focus a few times making just watching a contributing factor to my headache via eyestrain. I'm going to stop here for tonight and post another update with the finished piece later this week.

Thursday, April 14, 2016

April Challenge~ Tatting butterfly~ Ankars style


The pattern was originally shared on Facebook by Angela Gambka. She also made a video to show her technique, which I found incredibly useful. I finally got my Rewards stash of the month from the Sears Rewards Program and plan on using the beads for it. I have that coworker who loves anything butterfly, and at least I have someone to give it to when it's complete. Since this involves beadwork and a lot of it compared to my normal tatting activities, I'm going to wait until I have a full day off from my IRL to start it.
Although, I  will most likely be working this first in size 20 then maybe size 40 thread. I'm not certain on the gauging because of the actual beads I have to work with.

March Challenge~ Clay and Resin

This was both a failure and a success.
It started out great, but I had to walk away and he tipped to the side as the resin cured. There was no saving it now. I did the best but got confused on the resin make I was using and using different resins left a cloudy appearance to the piece.


 I did my best to sculpt it into something resembling the original project picture...


Since I was already doing Vaporeon in water, I decided to work this Pin as well.

It came out so much better. Maybe it turned out better because of it's Chibi size style.
It still needs it's flowers. One problem may have been the time factor. I really should've worked on this when I had the proper time to devote to watching these pieces. Resin needs to be babysat to make sure it comes out the way you want. I left it unsupervised, and like a rowdy teenager, it did what it wanted and all I could do was my best to clean up after it.

February's Challenge~ Tatting


Only one motif is worked from this pin. It was made with Aunt Lydia's Crochet thread in size 20 white.

 
This second motif was also made after finding it on the Pinner's webpage. It was also made using the same thread as the first motif.